Window tint failures are most often caused by installation and curing mistakes rather than defects in the film itself. Bubbling, peeling, discoloration, haze, and weak adhesion typically occur when timing, environmental conditions, or surface preparation are not properly controlled. When installed correctly, modern window film can maintain clarity, heat rejection, and durability for many years.
The difference between a long-lasting installation and a failed one is almost always process control, not material quality.
Why Timing Matters for Window Tint Longevity
Window tint relies on a pressure-sensitive adhesive that must go through a curing phase to fully bond to glass. This curing process is highly sensitive to environmental conditions, including temperature, humidity, and airflow, during installation and in the days immediately after.
When conditions are stable, the adhesive bonds evenly and creates a uniform optical finish. When conditions are unstable, the adhesive behaves inconsistently, leading to defects that become permanent after curing.
High heat accelerates adhesive activation, reducing working time and increasing the risk of misalignment. Cold temperatures slow down bonding and leave the film vulnerable to shifting or lifting. High humidity can trap moisture under the film, creating visible haze or bubbling that may not dissipate naturally.
In practical terms, timing determines whether the adhesive cures cleanly or traps imperfections into the final result.
Common Window Tint Mistakes That Reduce Lifespan
Installing in Extreme Heat or Cold
Temperature extremes are one of the most common causes of tint failure. Excessive heat causes the adhesive to “flash bond” too quickly, limiting the ability to reposition. Cold environments slow curing, which increases the risk of edge lifting and weak long-term adhesion.
Installing During High Humidity
Humidity increases the likelihood that moisture will be trapped between the film and the glass. This trapped moisture leads to cloudiness, uneven curing, and bubbling that may worsen as the adhesive stabilizes.
Not Cleaning the Glass Properly
Glass contamination is one of the most overlooked causes of installation failure. Even invisible residue such as oils, silicone, or cleaning agents can create micro-barriers that prevent full adhesive contact. These imperfections remain permanently visible after curing.
Using Low-Quality Film
Low-grade films often use weaker adhesives and unstable dyes. Over time, this results in fading, purple discoloration, reduced UV protection, and early adhesive breakdown. Higher-quality films maintain optical clarity and performance stability for significantly longer periods.
Rushing the Curing Process
Curing is the phase where the adhesive fully stabilizes and bonds to the glass surface. Interfering with the film too early, such as cleaning, touching, or exposing it to window movement, can disrupt bonding and create permanent defects.
Rolling Windows Down Too Soon
Lowering windows before curing is complete can shift the film at the edges. This movement often results in peeling that gradually expands over time, especially along window seals.
Attempting DIY Without Proper Setup
DIY installations often lack environmental control, proper lighting, and contamination-free conditions. Dust particles, inconsistent pressure, and airflow disturbances significantly increase the likelihood of installation defects.
Ignoring Manufacturer Instructions
Every window film is engineered with specific installation parameters, including temperature range, slip solution ratios, and curing duration. Ignoring these instructions reduces performance consistency and can void warranty protection.
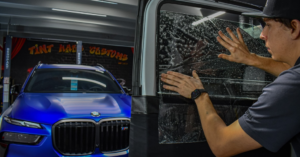
Common Mistakes When Learning How to Tint Car Windows
Learning to tint car windows without professional experience often leads to predictable installation errors that directly affect performance and appearance. For South Florida window tint applications, where intense sunlight, heat, and humidity place additional demands on the film, proper installation techniques are especially important to ensure a clean finish, optimal heat rejection, and long-lasting durability.
Misalignment During Installation
Once the adhesive begins to contact the glass, repositioning becomes limited. Misalignment results in uneven edges, poor symmetry, and visible distortion that cannot be corrected after curing.
Dust and Contamination Under Film
Airborne particles trapped during installation remain permanently sealed under the film. These defects become more noticeable over time as the adhesive fully cures and clarity increases.
Inconsistent Squeegee Technique
Uneven pressure during application leads to trapped water pockets or air bubbles. These imperfections create visual distortion and can weaken adhesion in localized areas.
Poor Edge Finishing
Edges are the most vulnerable part of a tint installation. Improper trimming or sealing creates weak points where peeling typically begins.
Difficulty With Curved Glass Surfaces
Modern vehicles often feature curved rear or side windows that require heat-shrinking techniques. Without proper experience, film can wrinkle, stretch unevenly, or distort under tension.
Why a Window Tint Installation Kit Does Not Prevent Every Mistake
A window tint installation in South Florida kit typically includes basic tools such as squeegees, blades, spray bottles, and application solution. While these tools are necessary, they do not control environmental conditions or compensate for a lack of experience.
Most window tint failures are not caused by missing equipment but by uncontrolled variables during installation. Even with a complete kit, issues still occur when:
- Dust enters the workspace during application
- Temperature changes affect adhesive behavior
- Incorrect pressure traps moisture under the film
- Misalignment occurs during initial placement
In other words, tools support the process, but technique and environment determine the outcome.
How to Tint Truck Windows: Mistakes to Avoid
Truck windows introduce additional complexity due to size, curvature, and increased surface area.
Handling Oversized Glass Panels
Large glass panels increase handling difficulty and extend exposure time, which raises the risk of contamination during installation.
Misjudging Curved Geometry
Improper film shaping creates tension points that eventually lead to lifting edges or distortion after curing.
Inconsistent Alignment Across Large Surfaces
Small alignment errors become more visible across larger glass areas, making precision significantly more important than on standard vehicles.
Extended Exposure During Installation
Longer installation times increase the risk of dust, airflow interference, and adhesive contamination before final placement.
Why Cheap Window Tinting Can Lead to Costly Mistakes
Low-cost window tinting often reduces expenses by using lower-quality film or shortening installation time. While this may appear cost-effective initially, it frequently leads to long-term performance issues.
Common outcomes of low-cost installations include:
- Premature fading or discoloration due to unstable pigments
- Reduced heat rejection performance
- Weak adhesive bonding that leads to bubbling or peeling
- Early failure requiring full replacement
Over time, the cost of reinstallation often exceeds the price difference between budget and professional-grade work. This makes cheap tinting a higher-risk option from a long-term value perspective.
Why Professional Installation Helps Prevent These Mistakes
Professional installation reduces risk by controlling environmental conditions and applying proven installation techniques.
In one case involving a vehicle in Pembroke Pines, premature bubbling was traced back to high humidity during installation rather than film quality. In another instance in Miramar, microscopic residue left during glass preparation caused permanent contamination beneath the film. A separate case in Weston showed edge lifting caused by rolling windows down before full curing was complete.
These examples highlight a consistent pattern: most failures are procedural rather than material-based.
Professional installers reduce these risks by:
- Controlling temperature and humidity during installation
- Ensuring complete surface decontamination before application
- Following manufacturer-specific curing requirements
- Applying advanced shaping and heat techniques for complex glass
At Tint Haus, each installation is tailored to the film type, vehicle design, and the unique environmental conditions associated with window tinting in South Florida, ensuring long-term durability, consistent optical clarity, and reliable performance in the region’s intense sun, heat, humidity, and coastal climate.
Key Window Tint Specifications
UV Rejection: The percentage of ultraviolet radiation blocked by the film, helping reduce skin exposure and interior fading.
Heat Rejection: The percentage of infrared energy blocked, reducing cabin heat buildup.
Visible Light Transmission (VLT): The percentage of visible light allowed through the film, determining tint darkness.
Adhesion Strength: The long-term ability of the film to remain bonded to glass without lifting or separating.
Curing Time: The period required for adhesive stabilization after installation before full performance is achieved.
Summary
Window tint performance depends on installation timing, environmental control, surface preparation, and curing discipline. Most common failures, such as bubbling, peeling, fading, and adhesion loss, are preventable when proper procedures are followed.
Understanding these mistakes helps ensure greater clarity, longer lifespan, and improved heat-rejection performance over time.
Window tint longevity is determined by process quality, not just material selection. At Tint Haus Customs, avoiding installation mistakes and ensuring proper curing conditions are essential steps that significantly improve the long-term performance, durability, and appearance of automotive window tint. Proper installation techniques help maintain optical clarity, reduce the risk of peeling or bubbling, and maximize the lifespan of the film.
For professional installation and reliable results, contact us today.
People Also Ask (FAQ)
Why does window tint bubble after installation?
Bubbling is usually caused by trapped moisture, dust contamination, or improper curing conditions rather than defective film.
How long does window tint take to fully cure?
Most window tints take between 3–10 days to fully cure, depending on environmental conditions.
Can window tint be installed in humid weather?
Yes, but humidity increases the risk of moisture entrapment and requires stricter installation control.
Why does window tint peel at the edges?
Edge peeling is commonly caused by premature window use, poor surface preparation, or incomplete adhesion during curing.
Is DIY window tinting reliable for beginners?
DIY tinting windows for beginners carries a higher risk of defects due to a lack of environmental control and technical experience.